Using one gel for a subtle lighting effect
Lighting your subject using one gel is a simple and great way to either set an overall mood or add interest to a specific area of the image, such as hair, clothing, silhouette, or other details.

This technique can be achieved through the use of either one light (gelled) or by adding extra lights (non-gelled), and can be made of as many units as required. What we need to ensure when working with a setup of this type is that we have good control over both the direction and power of the lights, to avoid colours being too intense or spreading to unwanted areas. This lighting effect is mainly achieved through a few simple steps:
- Decide what area of the picture your coloured light will be directed to and choose the appropriate light modifier to suit your requirements. For instance, lighting only hair may require the use of a precise tool such as a snoot while lighting the whole subject may work best with lamp reflectors or softboxes.
- Decide what colour gel to use, taking into account the already existing colours of clothing, background, makeup, and so on, and paying attention to the colour wheel.
- Select a light intensity proportioned to the amount of colour desired.
In a one-gel setup, the gel will be placed on a light unit pointed directly and only toward the area of the subject’s face and body that you wish to colour. One or more additional units without gels can then be used to lighten other relevant parts of the subjects. It helps to know that by feathering, bouncing, or using diffusers such as softboxes, we can soften the output of the light and avoid harsh colours, obtaining the finest results.

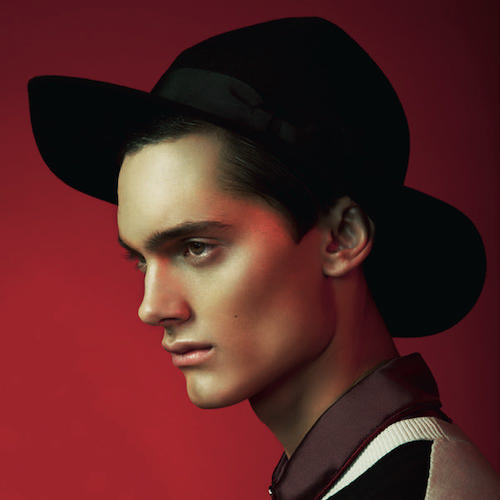
In the feature image, the main light was equipped with a medium softbox and placed about 60° around to the camera’s left-hand side, pointing directly toward the subject’s face. The other unit, matched with a red gel, was used as an accent and placed on the right-hand side of the camera, slightly feathered and directed just off the model’s side. This positioning automatically decreased both the light output and its spread, avoiding the colour being too rich and overwhelming, or spreading to unwanted areas on the face.